Some of you know I’m an Instagram fan, and try to post a photo daily. I love Instagram for the variety of images I see every day and that it allows me a place for self-expression.
I’ve been shooting with a Google Pixel2 and a Verizon Google Pixel 2XL for quite a while now. I have to say after being a devoted iPhone user since the beginning, I now think Android is a piece of cake, but more importantly, I am in love with both Pixels.
It’s not just the ease of using an Android. Once you get the gist of how they work, it’s pretty easy to figure out any of them!
So ease of use is important. Service quality is important, too. I’ve mentioned numerous times we have a house near Mount Rainier that is listed on AirBNB, and Verizon is still the most reliable service out there.
But the cameras on these two devices! Wow. They’re amazing. They capture such minute detail that often I’ll shoot something then blow it way up and crop a tiny part of it to post, still maintaining incredible details.
This week I stopped by my mechanic, CarTender, on Capitol Hill. Paolo, one of the guys who works there, told me he bought a Pixel 2 BECAUSE of my INSTAGRAM PHOTOS! Wow!
So I’m sharing a few of the photos I’ve shot this month. From the top down, are:
Peonies from my sister’s garden
A view of the Jimi Hendrix Park in Seattle
Wild roses from my garden
Basketball scrimmage after school
The “Eraser” sculpture at the Seattle Center
Weird graphic asphalt lines leading to the Museum of Pop Culture
A view of the Madrona Bathhouse on Lake Washington
The view from the end of the bar at 13 Coins in Pioneer Square
Plants reaching for the sky
A shed in Madrona with a pretty patina
Glimmering city of Bellevue seen from Madrona at Lake Washington
Happy sunflowers!
The first Amazon Bookstore, located in the University Village of Seattle
Century Link Tower seen through a gap in a grate
A tree before it budded
Expressive clouds seen from the Montlake Bridge
I’ve posted more than 16,000 photos on my Instagram account. As an early adopter, I went crazy at first, sometimes sharing a dozen or more pictures a day. Now, usually just one a day, although sometimes I skip.
I’d love to have you check out my photos. If you follow me there, post a comment to let me know, and I’ll follow back! And if you see the photos I’ve previewed below, you’ll usually find a more complete description on Instagram
Thank you for looking! And remember: #BetterMatters
This is my first attempt to shoot a video and edit it, and also my first exploration inside of a laptop!
A month ago I installed 32 GB of RAM in my 27” iMac. It was super easy! My buddy Reg Saddler was with me, virtually, providing guidance and support.
It got me thinking about my mid-2012 Macbook Pro, and how it had just 4 GB of RAM. I decided to upgrade to its maximum — 8 GB, but wasn’t sure where to start.
I’d never opened up a laptop, and installing RAM in a laptop looked more complicated than the installation on my iMac. So I asked my friend, Greg, to help me. But instead of helping me, he actually did the installation!
It worked out well, because it gave me a chance to record the process using my new Samsung Galaxy 7 (S7), which has a pretty powerful video editor built in.
I’ve never edited a video before, and had no idea what I was doing, so imagine how surprised I was to discover it’s simple to do all of the editing and post-production on the S7.
During the RAM installation, I recorded about 14 minutes of video in four different segments . Most of it was a major snoozefest, or just chitchat that needed to go away.
So I omitted the audio by turning off the volume on all of the clips, prior to assembling everything.
At the time I was editing, I actually didn’t have the presence of mind to take screen shots, so a bunch of the following images are after the fact!
Part One — EDITING THE VIDEO
On the S7, I navigated to my camera’s roll and opened the first of four segments I’d filmed.
Once opened, at the bottom of the screen there was an option to “Edit”
From there I found the “Video Editor” option.
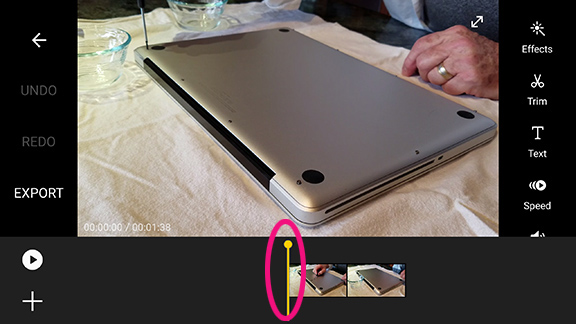
Once “Video Editor” is clicked, a screen comes up, showing the video represented by linear thumbnails. The yellow line is the beginning of the playback.
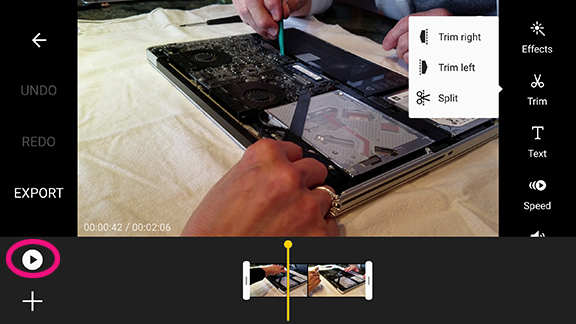
Hit the play button (small round arrow button in lower left quadrant) to review. To get rid of irrelevant content, you can split or trim parts of the clip. To do that, select“Trim” from the menu. A sub-menu pops up where you can select trim to the left, right, or split into pieces.
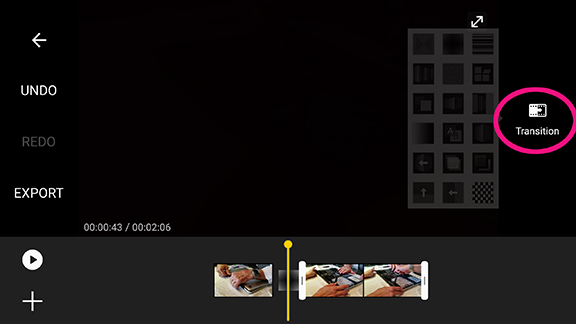
I decided to “Split” the section in two. A box then appears between the two sections. By resting the vertical playback line on top of it, a “Transition” menu will come up.
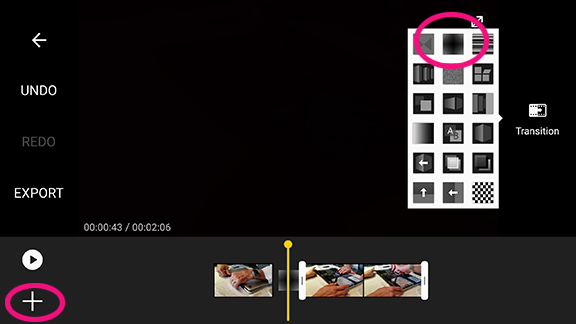
There are quite a few options for transitions between clips. I just chose a simple black dissolve (top middle on this image). To add a segment, I clicked the “+” symbol in the lower left corner.
I navigated back to my camera’s files and selected the next clip, which then appears in the timeline as anew thumbnail. (Note an additional “transition box” appeared.)
When I had all of my clips trimmed and assembled, just for the heck of it, I decided to add a couple of titles. To do that, I selected “Title.” A bunch of choices pop up. I chose black.
A box opens to type in some copy. Just try to make sure you check your spelling. Typos in videos happen here.
For the purposes of this sequence, I typed in “Sample Title,” but in my final video I inserted three title pages. When I was finished, I looked at the video and jotted down what I wanted to say. (NOTE: There is probably a better work flow, but since I didn’t know what I was doing, this is what happened with me!)
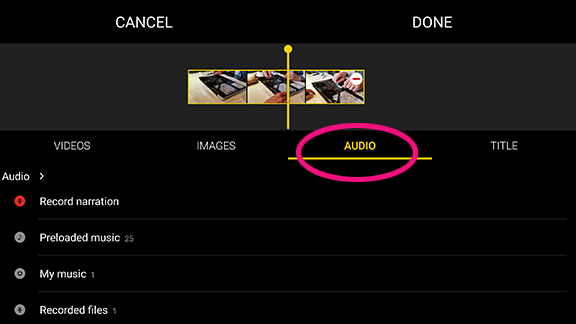
I figured out I could add narration by selecting “AUDIO.” There are several choices, and I selected “Record narration.” So while the video was playing back, I recorded my voice to go with the video. The primary reason I did this is because I decided to speed everything up 2X, which meant my voice sounded like I was talking through helium. It had to be removed!
When I was done, I played it back to see how it sounded and looked. It wasn’t perfect, but hey, you have to start somewhere! I was satisfied — quite proud of myself, in fact! So I selected “EXPORT.”
The processing took a few minutes. When it was complete, I watched it again, then shared it on to YouTube.
The S7 is a great device — much smaller than my Nexus 6P or Samsung Edge 6+ — so it fit easily into my little phone mount and desktop tripod, but more importantly, it recorded really beautiful video. So beautiful, in fact, that when I did the screen grabs, the resolutions looked very nice.
Here is the final video: [ insert anti-climactic drumroll here ]
The completed video, which was sped up 2X, cut it down to about 3 minutes.
Part 2: THE RAM INSTALLATION
Greg is a former graphic designer and art director, retired from Microsoft. He and I have a long history of geeking out, talking about computers, gadgets and related topics that make both of our spouses’ eyes glaze over. This was the perfect project for us!
It’s all covered in the video, above, but here are a few highlights:
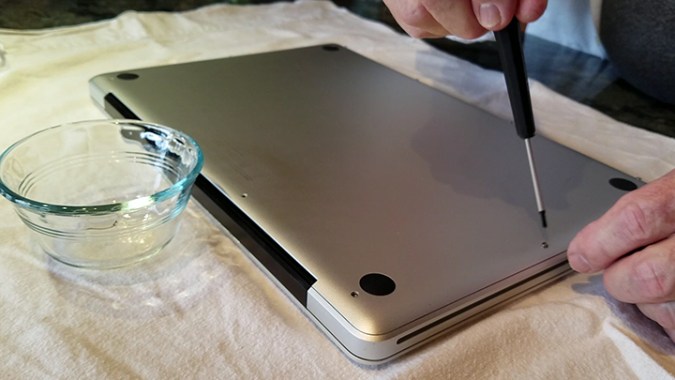
First, we unscrewed the back. Three of the screws are longer, so we put them aside and marked the holes before removing the rest of the screws, which were much shorter.
Next, we disconnected the battery using a nylon pry tool
After discharging static electricity, ease open clips holding in the RAM, and removed the two sticks.
Next, the new RAM was inserted into the slots. They were firmly snapped into place
We closed the back of the laptop, first treating screws with an anti-vibration goop.
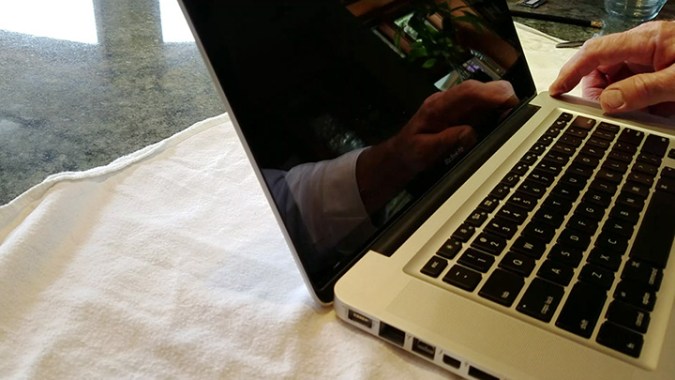
Moment of truth: Booted it up…
Happy to hear the Mac start up sound and see the Apple logo appear!
VOILA!
So, this entire process involved learning on a couple of levels. It was amazing and fun to shoot, then edit a video entirely on my S7. Second, I’m no longer afraid of opening up my laptop. SSD, here I come!
PS: A cool way to take screen shots on the S7:
Hold your hand perpendicular to the phone screen (like you’re going to give it a karate chop).
Swipe your hand quickly to the left or right. You’ll hear a “click.” BINGO! Screen shot taken!
Video and images shot by Terri Nakamura, using a Samsung Galaxy 7, courtesy of Verizon Wireless.
I’m proud to participate as a member of Verizon’s social media outreach team. My posts are about my own personal experiences. No compensation is provided, nor are favorable comments promised. All opinions are my own.